WaterGreat SR-2 Watering system for Gravity Feed
Systems
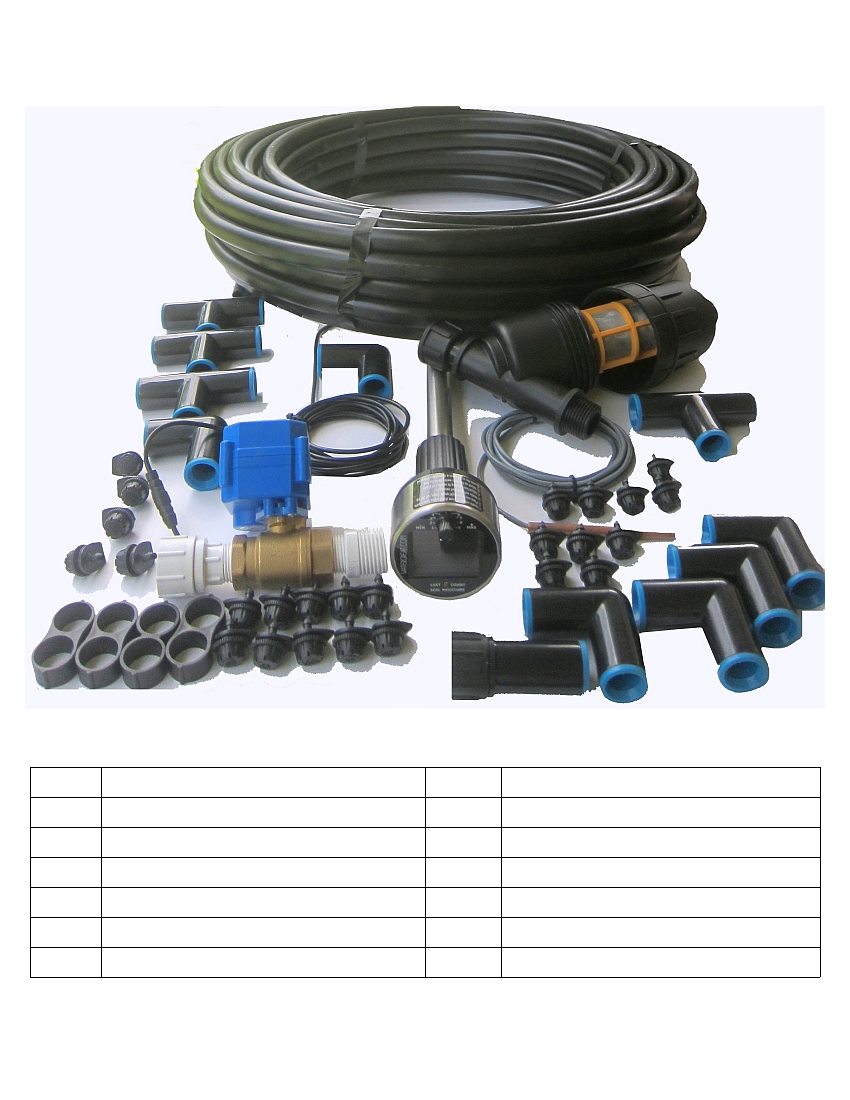
Congratulations on your purchase of the WaterGreat LLC SR-2 watering system for
Gravity Feed Applications. Your kit includes the following:
Quant
Description
Quant
Description
1
SR-2 Controller Assembly
6
0.71 inch Elbow fittings
1
Motorized Gate Valve ½ inch
4
0.71 inch Tee fittings
1
Female Garden Hose Adapter to ½ inch
1
Male Garden Hose Adapter
100
0.71 inch Irrigation Tubing, feet
1
Female Garden Hose to 0.71inch Adapt
4
End of Line Plug
25
Adjustable Spray Bubbler 1/4”
1
Water Filter Housing, Hose Thread
1
Stainless Steel Filter, 150 Mesh
WaterGreat LLC
https://watergreat.com
WaterGreat SR-2 TM Installation
Thank you for purchasing the WaterGreat LLC SR-2 gravity feed watering controller.
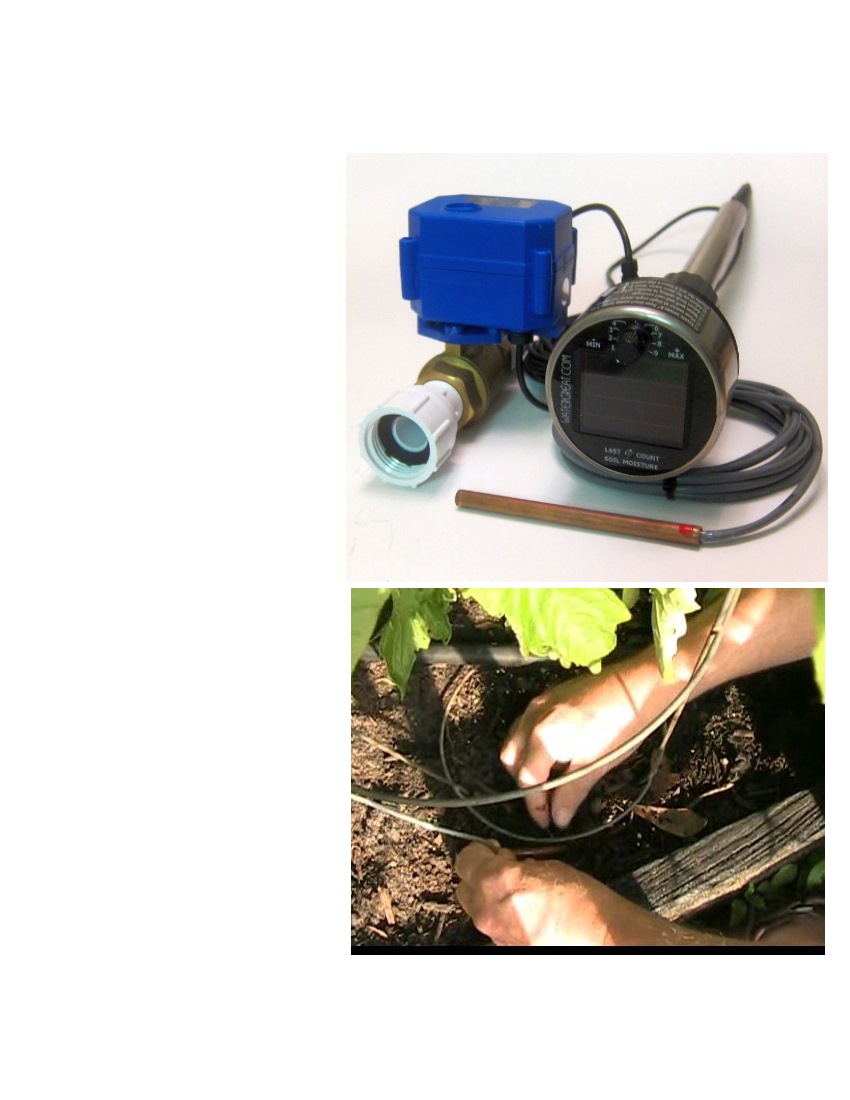
1) Attach stake and stainless steel tube to the control assembly as shown and place in
the ground where the sun shines
at least 5 hours a day. Turn knob
to below “1” for no watering (as
shown in picture) until the unit
charges in the sun (up to 24
hours).
2) Place the slender sensor rod in
an area watered by the system,
about 4 inches from a dripper if
using drip irrigation. Push the rod
into the soil, red dot UP at a slight
angle, so that lower tip is about 1
1/2 inches from the surface. Use
undisturbed soil. It is best to
place the sensor in an area that
dries the quickest. GIVE THE
AREA A GOOD WATERING
AFTER INSERTION.
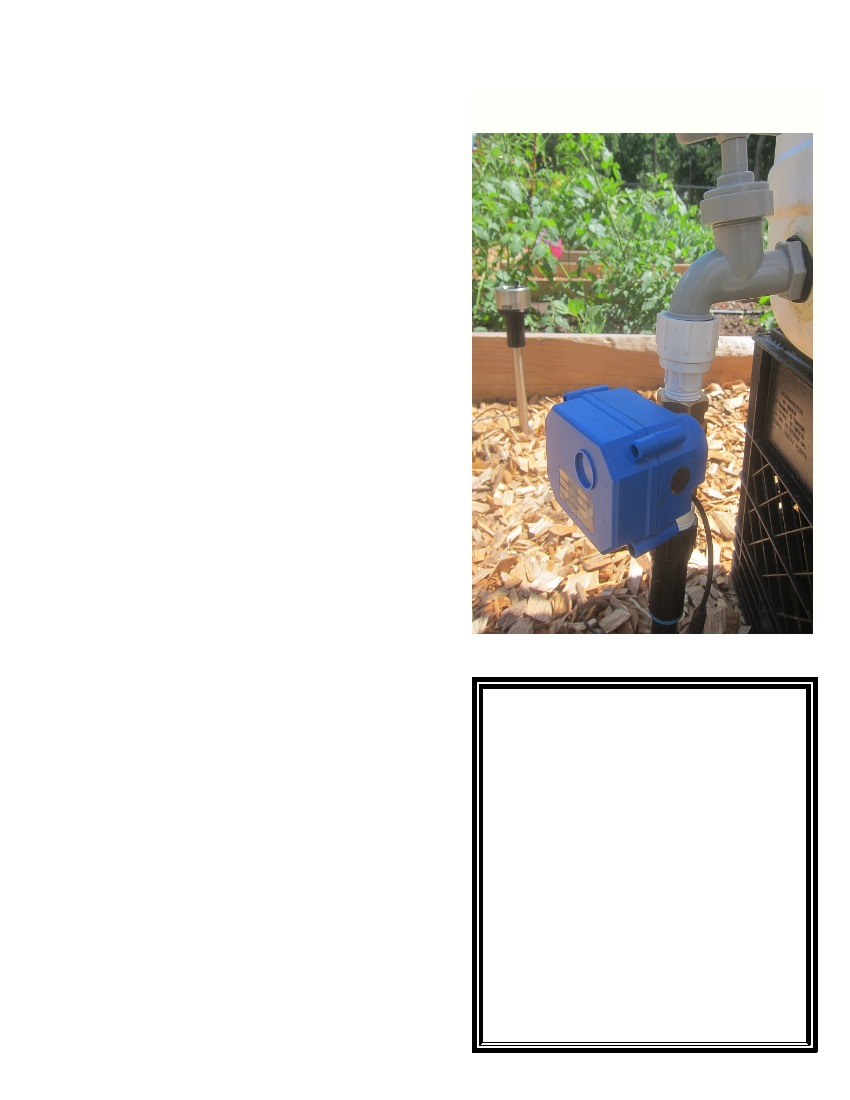
3) Connect the motorized gate valve
to a spigot or hose as shown.
Alternately, you may remove the
hose fittings and directly plumb to
1/2” NPT (gives maximum flow).
Connect the outlet to the drip
irrigation system or other watering
system. Gravity feed systems need
special care to ensure even
watering. Use big tubing and low
flow dripping if irrigating more than a
couple of plants. Use adjustable
drippers and make each dripper
output the same quantity of water. If
only watering one or two plants,
direct water so that each is watered
equally. See the section on
“Watering considerations for Gravity Feed Systems.” If desired, the valve can be directly
installed into PVC pipe or plumbing as well. Note the IN and OUT can be either side. If
sand or debris is present in the water, place a filter in-line prior to the valve.
WaterGreat LLC
https://watergreat.com
WaterGreat SR-2 Installation
4) The next day make a note of the number of
blinks on the controller. This gives you the
current soil moisture reading. Adjust the knob to
the same number as the blinks to give good
watering. Periodically check and turn up or down
if needed, using the knob. Higher numbers on
the knob provides higher soil moisture. The
system will water if the blinks (moisture reading)
goes BELOW the set value, for the time
determined by the switches on the underside of
the control assembly. (1, 3, 8 or 20 minutes).
The system measures the moisture 3 times a
day, in the morning, 4 hours later and 8 hours
later. The system maintains the last reading
even after watering, until the next measurement 4
hour later.
Need a shorter or longer watering time? Need a longer
cable from the valve to the controller? SEE ADVANCED
INSTRUCTIONS.
What is the basic operation of the system?
The solar panel charges the Lithium Iron Phosphate battery,
and sends a signal to the control module to permit daytime
watering. At daybreak and then every 4 hours, during daylight
hours, two additional soil moisture level measurements are
made. That level is compared with the user set ‘desired’
watering level. If the desired level is higher than the measured
(current) moisture level, a watering cycle begins, turning on the
valve for one, three, eight or twenty minutes, depending on the
SR-2 TM by WaterGreat TM LLC Limited Two Year
switch positions on the underside of the assembly. This
Warranty
amount of water prevents over-watering or water dripping
WaterGreat LLC warrants to its customers that its
through before it can be absorbed. It is possible to increase or
WaterGreat SR series products will be free from
decrease this amount of water if needed using the switches.
defects in materials and workmanship for a period of
The user adjusts the desired moisture level by turning the knob
two years from the date of purchase. We will replace,
at the top of the control assembly to raise or lower the desired
free of charge, the defective part or parts found to be
moisture setting. This is just the same as turning up or down
defective under normal use and service for a period of
the volume on a stereo. Every twenty seconds, the LED (Light
up to two years after purchase (proof of purchase
Emitting Diode) will blink and indicates the ‘Current’ or
required). We reserve the right to inspect the defective
part prior to replacement. WaterGreat LLC will not be
measured moisture level. At any time a watering cycle is
responsible for consequential or incidental cost or
initiated when the knob is turned wetter than the current
damage caused by the product failure. WaterGreat
reading. Watering is stopped manually by turning the knob
LLC liability under this warranty is limited solely to
“down.” All the way down stops all watering. At night (1 blink) or
the replacement or repair of defective parts. To
if the battery is low (2 blinks) the LED flashes briefly once per
exercise your warranty, return the unit to WaterGreat
minute and the controller goes into a special low power mode.
LLC with a copy of the sales receipt. Contact us first.
We can often solve your issue without returning the
product. YOU ARE IMPORTANT TO US. We
will work with you to provide reduced pricing
for any units under five years.
WaterGreat LLC
https://watergreat.com
Watering considerations for Gravity Feed Systems
Introduction: Nearly every gravity feed system has only a small amount of elevation, making piping
sizing and water flow a challenge. This section provides some background information to provide good
watering for gravity feed and rain barrel systems.
Quick Tips:
1) Your barrel or reservoir must be at least ONE FOOT above the ground – preferably
more. This height will overcome the losses through the valve, filter and piping.
2) If watering multiple plants use a 0.710 tubing (0.62 inch inner diameter) or larger. The
smaller tubing restricts too much.
3) Use drippers what allow for individual adjustment. Adjust drippers (or miniature
sprayers to produce a small trickle out of each outlet. In out gravity feed watering
complete systems, we use an Adjustable Full Circle Stream Spray Bubbler 1/4"
Barbed Inlet This adjustable bubbler works well when turned down as an
adjustable dripper for gravity feed systems.
4) Try to keep the total flow for the 0.710 tubing to about ½ gallon per minute or less to
provide consistent results. The drippers (bubblers) at the end of the lines will have to
be opened slightly more to allow for piping loss.
5) Instead of one long feed line, run a line to a central location and then Tee as needed
from there. This keeps the total feed line distance to a minimum, and the flow
through each pipe at a minimum.
6) Use of a 50 foot quality 5/8” garden hose, or a ¾ inch PVC pipe can extend the line
from the water reservoir to the garden area without harm. A 1 inch PVC pipe can
extend 100 to 150 feet without harm, as long as the total flow is ½ gallon per minute
or less.
7) See http://www.freecalc.com/fricfram.htm to calculate losses for other type piping and
valves. Generally for your flow you must have 0.3 feet of head loss - for the whole
system - or your water will not flow completely through the pipe. This assumes you
have raised your water
source at least 1 foot
above the ground.
By purchasing this100 foot 25
dripper watering system for
gravity feed system all of the
recommendations above are
incorporated to get you up
and watering right away. It
hooks directly to the SR-2, or
you may use PVC or a 5/8”
garden hose to extend the
water to your garden area.
WaterGreat LLC
https://watergreat.com
Installing the Gravity Feed System
1. Locate your cistern or rain barrel at least ONE FOOT above the ground level – the
higher the better.
2. The outlet can be a conventional spigot, but performance is improved if a ball valve of
¾ inch is used. The outlet should be a ¾ inch Male Hose Thread.
3. Use of screening highly recommended in rain barrel at water outlet. Install the
stainless mesh filter assembly always before the valve. Without screening the pipe
and drippers may plug from debris.
4. PVC may be used to extend the piping from the rain barrel or cistern. Use ¾ inch
schedule 40 or larger. Terminate the PVC with a male garden hose thread fitting. A
high quality 5/8 inch hose may also be used.
5. Use the supplied elbow fittings to install the tubing as your design dictates. Do not
kink the hose! Lay the tubing roll in the sun for a day with each end weighed down to
allow it to straighten out. Often the feed line is buried if not in the garden area. At the
garden use another elbow to bring the tubing above ground, and another elbow to
direct it to your watering area. Hint: You may make small cuts on the end of the
tubing to make insertion easier into the fittings. You may also use hot water to soften
the end prior to insertion to make it easier. Caution: Do not burn yourself with the hot
water.
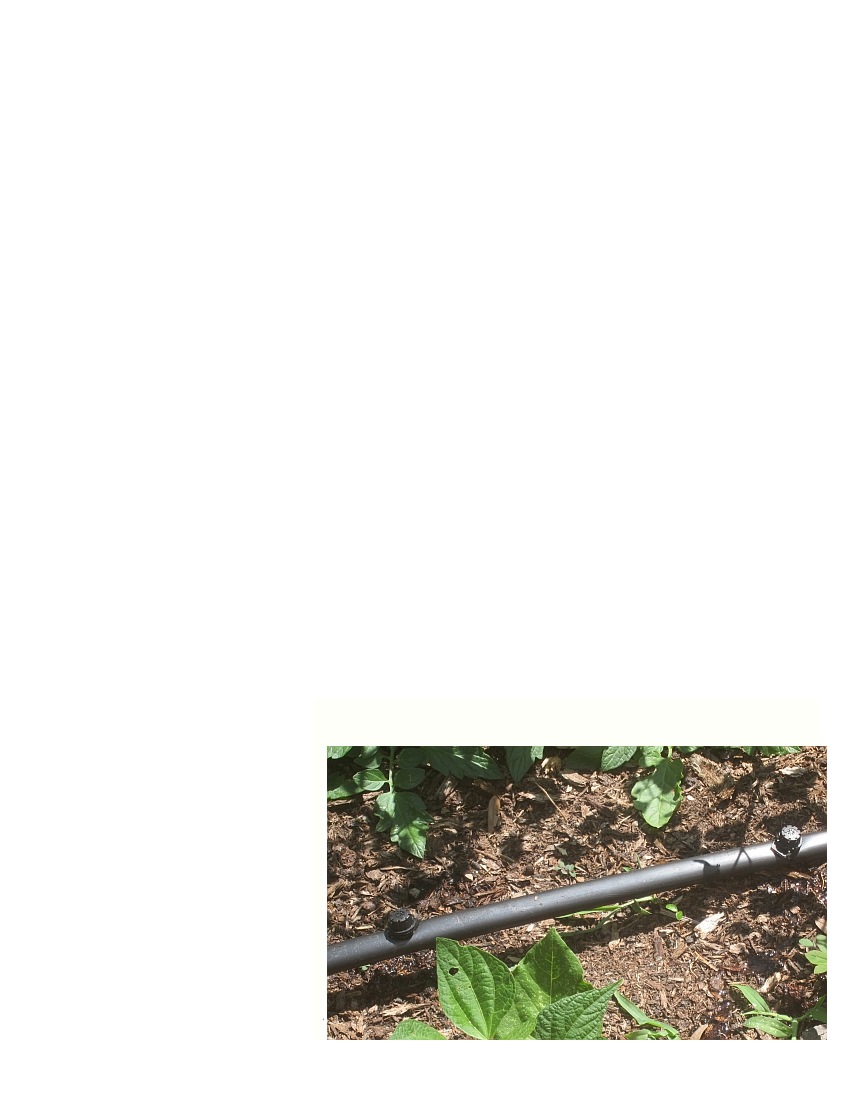
6. Locate the feed tubing as centrally located as possible, with feed lines to your plant
going from there. Always try to avoid one long run with all of the bubblers / drippers.
This arrangement lowers the pressure drop for each leg to provide the most
consistent watering flow.
7. Locate the SR2 controller in the garden area, so that the sensor may be placed near
the drippers. After the controller is reading the moisture, you may adjust the knob to
a higher setting than the number of blinks. The valve will then open over 5 seconds
and allow for inspection of your installation. As necessary adjust each dripper /
bubbler to provide even watering from all drippers. Your watering area needs to be
level for best results. Turning the knob down stops watering.
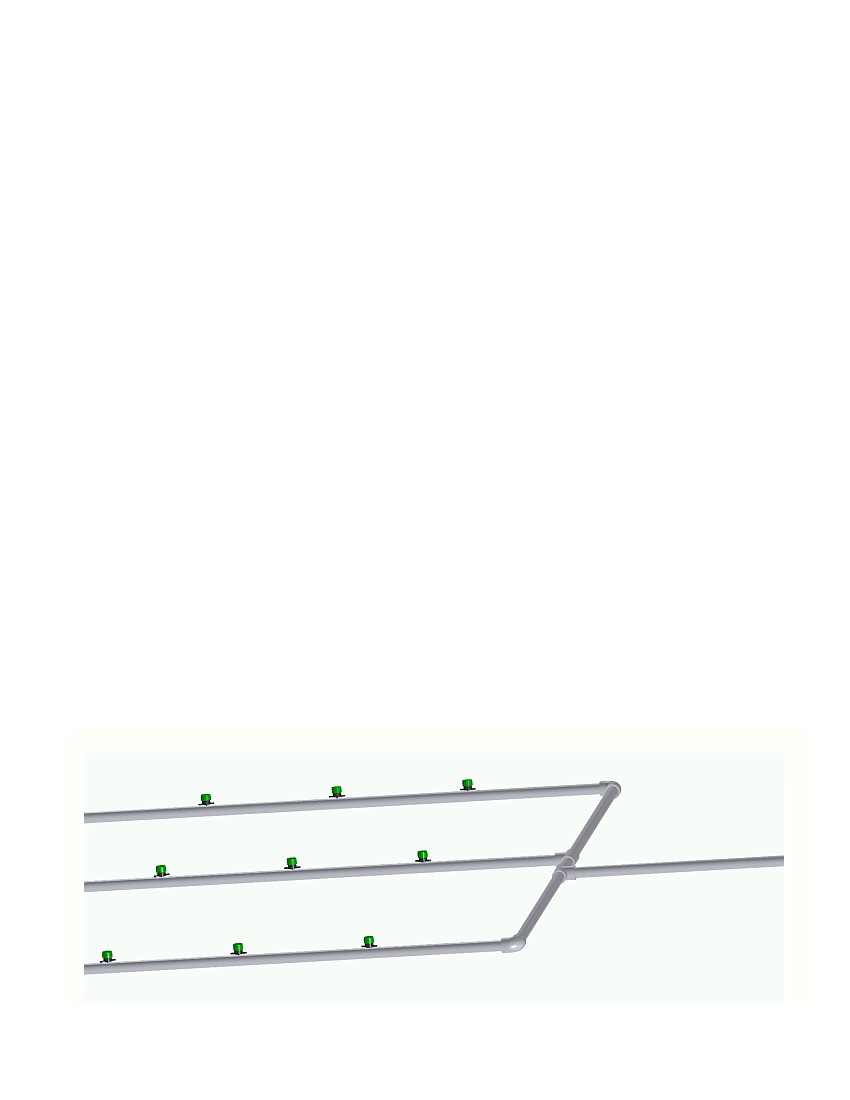
Typical Installation using SR-2 Kit (Color for illustration, actual color is black)
WaterGreat LLC
https://watergreat.com
WaterGreat SR-1 TM Advanced Instructions
This document covers Setting the Watering Time, Connecting Wiring, and some basic
troubleshooting guides. Contact support@WaterGreat.com if you have inquiries or suggestions for
clarifying these procedures.
Setting the Watering Time
1) Twist the control head counter clockwise until it
hits the stop (a small amount), then separate the
control head from the black support housing. The
unit will separate showing the switches and
terminal strip on the left.
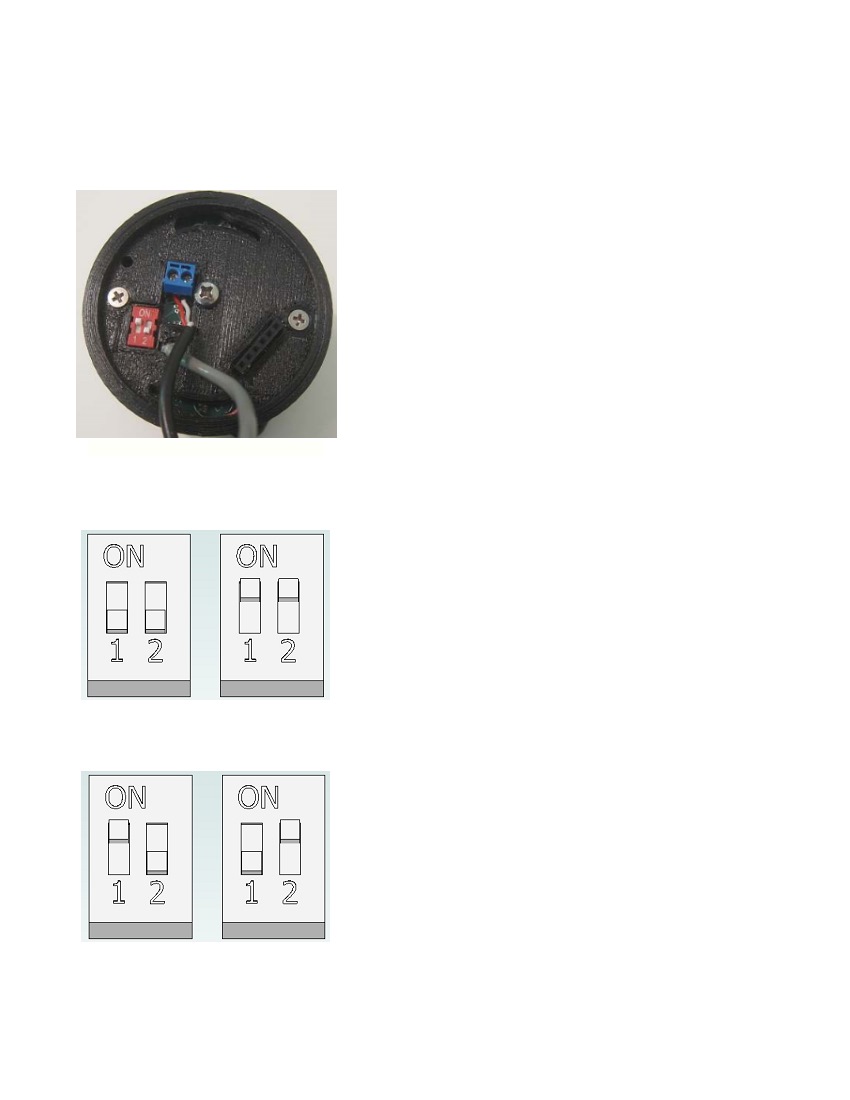
2) Using a fingernail, a pen tip or a small
screwdriver select the switches on the red switch
8 MINUTE WATERING
panel to the watering time you wish – 8 minutes,
1 MINUTE
3 MINUTE
20 minutes or one minute. As shown in the
WATERING
pictures and captions: Switch 1 ON and Switch 2
ON is 3 minutes;Switch 1 ON and Switch 2 OFF is
8 minutes; Switch 2 ON and Switch 1 OFF
provides 20 minutes of watering; both switches
OFF provides one minute of watering. Note: this
is only the watering time that occurs when the
SET point (by the knob) is greater than the
READING. The reading is shown by the blinking
LED that repeats the last measured soil moisture
every 20 seconds.
8 MINUTE
20 MINUTE
WATERING
Normally 3 minutes works well. 20 minutes is
used when a deep watering is desired, or with the
48 plant extender kit with the ½ gallon per hour
drippers or similar. The one minute setting usually
used when the three minutes it too much water,
such as watering small potted plants.
WaterGreat LLC
https://watergreat.com
WaterGreat SR-1 Advanced Instructions
Removing or Lengthening the Wiring to the Valve
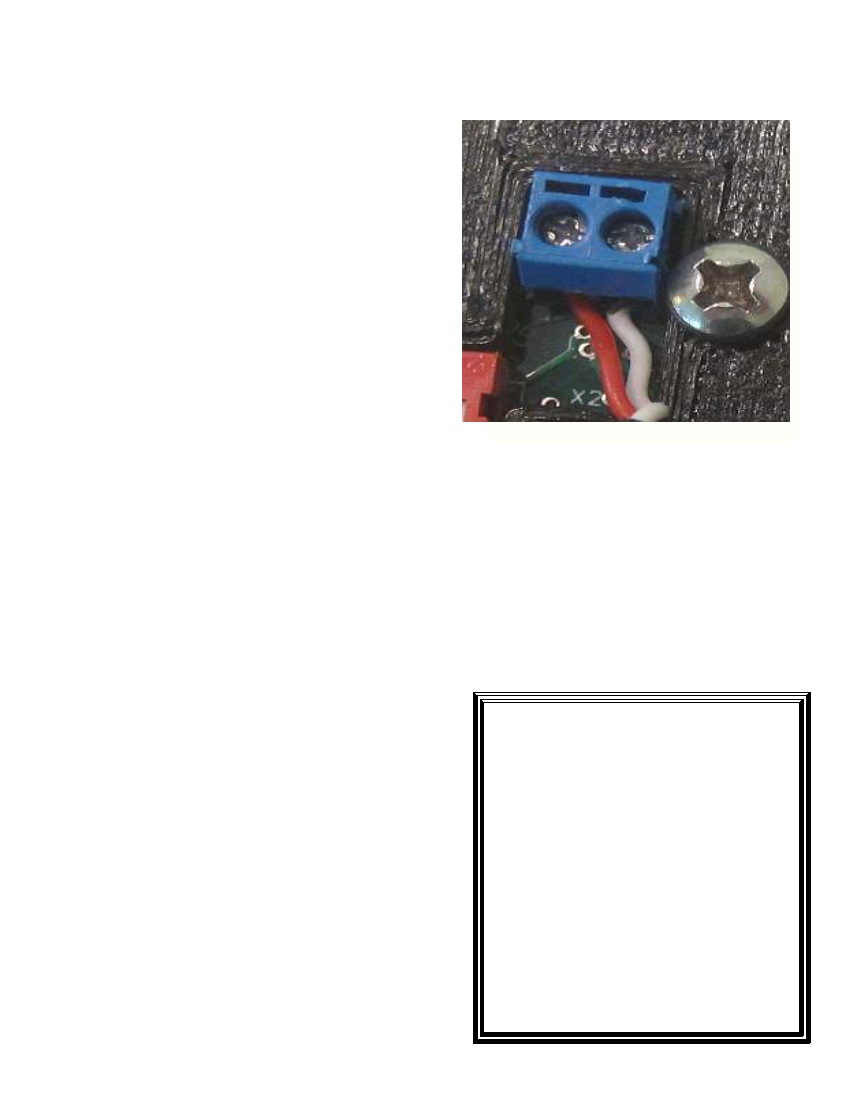
Summary: Consumers will occasionally wish to
re-route their valve wiring, or extend it if the 9 ½
feet length is not adequate. Simple take care in
removing the wiring, and pay particular attention
to keeping the wiring as shown: Red wire (or
attached wire tied to the red wire) on the LEFT
and the White wire on the right.
If by accident you reverse this wiring you will
not harm the system, but the 'ON' and the 'OFF
function of the valve will be reversed. If turning
the moisture knob all of the way down turns the
valve 'ON' you have reversed the wires.
Notice: This terminal strip uses a small opening
Valve Wiring -Red wire on Left
and screwdriver. Take care in making sure you
re-install the wiring in the proper hole, and when
you tighten the wire back make sure that you
have good insertion into the hole. Mistakenly
shorting the two wires together, such as bare
wires of the white touching the red during valve
operation will short out the output transistors in
the controller, and it will fail. Shorting the wiring
is not covered by warranty, so be careful!
Always turn the knob all of the way down before
working on the wiring.
SR-1 TM by WaterGreat TM LLC Support
To extend the wiring, just pay attention to the
We at WaterGreat LLC want you to
color coding and carefully remove the existing
be our customer for life. We will
cable from the drilled hole in the support
only sell you the same quality
product that has proven itself to us
housing. Purchase additional wiring (at least 22
as fellow gardeners. As part of this
gauge, preferably larger. Then use an outdoor
customer relationship, we promise
rated splice to attach the existing cable to your
to provide friendly prompt customer
new cable. If needed, you may enlarge the hole
support by email, and we'll do our
in the support housing to fit the new wire. It is
best to answer back within one
not recommended to enlarge the hole much as
business day or sooner. Please
contact support@watergreat.com for
it may crack the support housing. Most
any questions. We also love to hear
hardware stores sell 22/2 stranded CM plenum
stories of success and enjoy
type cable that will fit into the existing support
pictures of happy gardens with this
housing hole. Do not extend more than 20 feet.
system.
WaterGreat LLC
https://watergreat.com

Error codes and Conditions:
LED indication
Condition
One brief blink per minute
Low light condition – normal
Two brief blinks per minute
Low battery – move into sun more
or contact support for battery
replacement
Three brief blinks per minute
Hardware failure – contact Support
Continuous blinking
Normal first 15 minutes in the
morning – then indicating a weak
battery if persists. Move into a
sunnier area. If problem persists
after two days, contact support for
a battery replacement.
Poor water flow
Check screen at input to the valve.
If clogged, remove stainless
housing screws and reverse flush
and re-install.
Very low moisture readings
Check that sensor is close to the
(few or no blinks)
irrigation source, and that the soil
appears moist. Reposition the
sensor to firm soil near the water
source or in the sprinkler pattern.
WaterGreat LLC
https://watergreat.com